How to Read a Fish Finder: The Complete Beginner’s Guide to Sonar
By the ChargedAnchor Team
Every angler who buys their first fish finder goes through the same experience. You power it on, you look at the screen, and you think — what in the world am I looking at?
Lines, arches, blobs, colors scrolling across the screen. It looks like something out of a submarine movie. You bought this thing to catch more fish and right now it’s just giving you a headache.
Here’s the truth: reading a fish finder is a skill. It takes a little time to learn, but once it clicks, it genuinely changes the way you fish forever. This guide is going to walk you through everything — how sonar works, what you’re seeing on screen, what the colors mean, and how to dial in your settings for the water you fish.
How Sonar Actually Works
Before you can read a fish finder you need to understand what it’s doing. SONAR stands for SOund NAvigation Ranging. A sonar device sends pulses of sound waves down through the water. When these pulses hit objects like fish, vegetation, or the bottom, they are reflected back to the surface. The sonar device measures how long it takes for the sound wave to travel down, hit an object, and bounce back — the same echolocation system bats and dolphins use. Deepersonar
The key thing to understand is the cone. Your transducer doesn’t just look straight down at a single point — it sends out a cone-shaped beam that gets wider the deeper it goes. Any return you see on screen could be anywhere within that cone. The side-to-side position of an image on screen has nothing to do with its left-right location relative to your boat. Boat Outfitters
Think of it like a flashlight shining down into murky water. The light spreads out the deeper it goes. Your fish finder works the same way.
Understanding What You See on Screen
The Bottom Line
The most obvious thing on your screen is a solid line running across the bottom — that’s the lake or river floor. The thickness and brightness of that line tells you something important.
A hard, less porous bottom such as rock or gravel shows up as a stronger, thicker line. A mud or clay bottom shows up as a thinner, lighter line. Citi Marine Store Some units display this in different colors — bright yellow or red for hard bottom, softer blue tones for mud and silt. When you’re bass fishing, hard bottom transitions are almost always worth investigating.
The Water Column
Everything between the surface and the bottom line is the water column — and this is where the story gets interesting. A fish finder screen shows you depth, water temperature, bottom composition, and speed all at once. CAST and SPEAR Learn to read each layer and you’ll know where the fish should be before you drop a bait.
Left vs. Right on the Screen
Here’s the thing that confuses most beginners. Everything to the left of the right-hand edge of your screen is history. The information on the right-hand edge represents what’s directly under your boat right now. Information farther to the left shows what was in the cone moments ago. Boat Outfitters
So as you move across the water, the screen is painting a picture of what you’ve passed over — like a scrolling timeline. The most current information is always on the right side.

How Fish Show Up on Screen
The Classic Arch
In most cases, fish show up on your display as an arch. The reason is simple — if a fish swims through your sonar cone, it returns impulses from the edge of the cone, then the middle, then the other edge. The returns from the edges have traveled slightly farther than the returns from the middle, creating the arc shape. Deepersonar
A big fish shows up as a longer, thicker arch. Smaller fish show up as smaller, thinner arches with a less defined curve. Citi Marine Store You’ll also see half arches when a fish passes through only part of your sonar cone — don’t ignore those, they count too.
The Long Arch Trap
Here’s the most common mistake beginners make. A long arch does not mean a big fish. Think of length as representing time. If a fish is stationary under your transducer, it shows as one continuous line — that doesn’t mean it’s a monster, it means it’s sitting still. Deepersonar A big fish that swims through the cone quickly can actually show a shorter arch than a small fish that lingers.
Fish Icons — Use Them to Start, Then Turn Them Off
Some fish finders have built-in technology called Fish ID on Humminbird or Fish Symbols on Garmin that automatically converts sonar arches believed to be fish into fish icons on screen. Citi Marine Store It’s a great training wheel for beginners but turn it off once you get comfortable. The icons miss half arches and sometimes flag structure as fish. Learning to read raw arches makes you a much better angler.
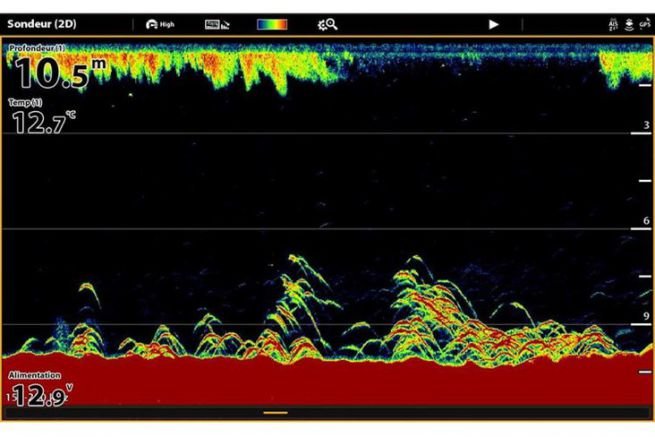
Understanding Sonar Colors
Colors on your fish finder represent signal strength — how hard or dense an object is. Different colors indicate density — yellow indicates a more solid return, red a little less so, and blue hues indicate a weak return. Wired2Fish Bright colors mean hard, dense objects. Soft colors mean soft objects or open water.
In practical terms:
- Bright red or yellow — rock, gravel, dense structure, large fish
- Orange — moderate density, smaller fish, harder mud bottom
- Blue or green — soft bottom, light vegetation, small baitfish
- Black or dark — open water, no return
Yellow blobs hanging in the branches of a submerged tree almost certainly indicate bass or crappie — and using the depth scale to gauge position, you can count individual fish within structure. Wired2Fish This is where the skill becomes genuinely powerful.
The Different Sonar Types Explained
Traditional 2D Sonar
This is what every fish finder has had for decades. A tight cone shoots down, scrolls across the screen, and shows you arches, bottom contour, and structure. This technology is very useful while fishing from the front deck and while idling — as you move over fish, schools of baitfish, or structure, you’ll see them appear on the right of the screen and trail off to the left. Wired2Fish
Down Imaging (DownScan / ClearVü)
While most 2D sonar draws a picture, the more advanced down imaging looks almost like a photograph. Outdoor Life It uses a thin, wide beam instead of a cone, producing much sharper, more detailed images of what’s directly below. You can clearly see individual branches on a submerged tree, the shape of rocks, and fish holding tight to structure.
Savvy anglers split their screen to run both 2D and down imaging simultaneously — they each show slightly different information.
Side Imaging (SideVü / Side Scan)
Side imaging extends your sonar outward on both sides of the boat, scanning everything to the left and right as far as 400 feet — giving you a 180-degree view of what you’re actually going to cast to. Boat Outfitters This is the most powerful search tool on a fish finder. Use it while idling to find structure, mark your waypoints, then come back and fish them with 2D or down imaging.
Forward Facing Sonar (LiveScope / MEGA Live)
This is the newest and most advanced technology — and it’s in a different category entirely. Forward facing sonar allows you to see fish move in real time, where all other technologies simply show you where fish were moments earlier. Wired2Fish The learning curve is steeper but the payoff is enormous.
Sonar Settings — How to Dial It In
Sensitivity / Gain
Sensitivity controls how much signal your unit displays. Too low and you miss fish. Too high and the screen fills with noise that hides what you’re looking for.
Start with sensitivity on auto and let the unit calibrate itself. As you get comfortable, try bumping it up manually to see more detail — then back it down if the screen gets too cluttered. Finding that sweet spot for your specific water is one of the most valuable skills you can develop.
Frequency
As a rule of thumb, lower frequency sonar like 50 or 83 kHz covers a wider area with less detail. Higher frequency like 200 kHz gives you a slimmer cone with more bottom definition. Citi Marine Store
In practical terms:
- Shallow water (under 30 feet) — run 200 kHz for maximum detail
- Deep water (30 feet and beyond) — drop to 83 or 50 kHz for better depth penetration
- CHIRP — if your unit has it, use it. CHIRP sweeps a range of frequencies simultaneously, giving you the best of both worlds — good detail and good depth penetration. CAST and SPEAR
Scroll Speed
Scroll speed controls how fast the image moves across the screen. When you’re idling to search water, slow it down so you get more detail. When you’re stationary and fishing one spot, speed it up slightly so you can see real-time returns more clearly.
Ping Speed
Most 2D down imaging units allow you to adjust ping settings so you can get more or less feedback. Outdoor Life More pings per second gives you more data when fishing vertically or slow trolling. Back it off when running at speed to reduce noise.
The Best Way to Learn — Find Known Structure
One great way to learn what you’re seeing is to go somewhere you know what’s underneath the surface. Drive over a place like an old roadbed, a brush pile, or a set of cinderblocks and see how that information is translated on your screen. Outdoor Life Once you know what a specific object looks like on sonar, you can recognize similar returns on unfamiliar water.
This is exactly how the pros learned. Pick a dock you can see from the surface, run over it slowly, and study every view — 2D, down imaging, and side imaging. You’ll never forget what a dock looks like on sonar after that.
Quick Reference Cheat Sheet
| What You See | What It Means |
|---|---|
| Thick bright bottom line | Hard bottom — rock or gravel |
| Thin soft bottom line | Mud or silt bottom |
| Full arch | Fish swam through your entire cone |
| Half arch | Fish passed through part of your cone — still counts |
| Long continuous line | Stationary fish or object |
| Bright red/yellow blob in structure | Dense object — likely fish |
| Scattered dots mid-column | Baitfish school |
| Fuzzy cloud near bottom | Vegetation or soft structure |
Final Thought
A fish finder is not a magic fish catcher. There are a lot more fish around than you think — but being around fish does not mean you will catch them. Boat Outfitters What your sonar does is dramatically shorten the time you spend fishing unproductive water. The angler who understands their graph finds fish faster, positions better, and catches more — period.
Take time to learn your unit on water you already know. The confidence you build there transfers everywhere else you fish.
Have a question about reading your specific unit? Drop it in the comments below and we’ll help you figure it out.
ChargedAnchor.com — Built by anglers, for anglers.